As a scalable framework for building high-end web applications, ASP.NET MVC5 would have definitely helped you in boosting your interest in handling web app development.
Considering your urge for learning more about the absolutely stunning world of ASP.NET MVC Development, I’ve written this tutorial which focuses on using the model first approach for connecting the ASP.NET app with database.
As you read through this post, you’ll come to know more about the Model First approach used in ASP.NET MVC5, its advantages along with a simple example that will enable you to understand its use during ASP.NET development.
To start off, let’s take a closer look at the Model First approach for connecting app with database
Before proceeding ahead with the explanation of steps involved in usage of model first technique, I’d like you to know more about the same. Well, the Model First approach has been introduced, keeping the designers in mind. That means, this process of connecting app with database works as the best match for designers who’re very keen of writing lengthy code or SQL commands. The in-built wizards do everything for you, ranging from creation of application and addition of entity data model to generation of database from model and performing the CRUD(Create, Read, Update and Delete) operations.Image may be NSFW.
Clik here to view.
Now, let me list out a few commendable advantages of using the Model First approach in ASP.NET MVC5
- Works best for small easy app development projects
With Model first approach, you just need to draw your model and the workflow will automatically generate the database script with the template being used for adding entities and their related properties. This is something that will serve as a handy option during execution of simple and less complex projects. - Eliminates the need for recreating database each time an entity or its property needs to be updated
Since its your model that defines the database, you can easily do away with the need for recreating the database each time an entity or any of its properties need to be altered. All you need to do is simply update the database scheme or you may even opt for updating the database project in Visual Studio.
And finally, let me teach you the implementation of model first approach using the Entity Framework 6 for connecting with the database via the web app
Now, the steps for connecting ASP.NET application with database using the ‘Model First’ technique:
Step 1- Create the ASP.NET web application
For this, simply follow the below steps:
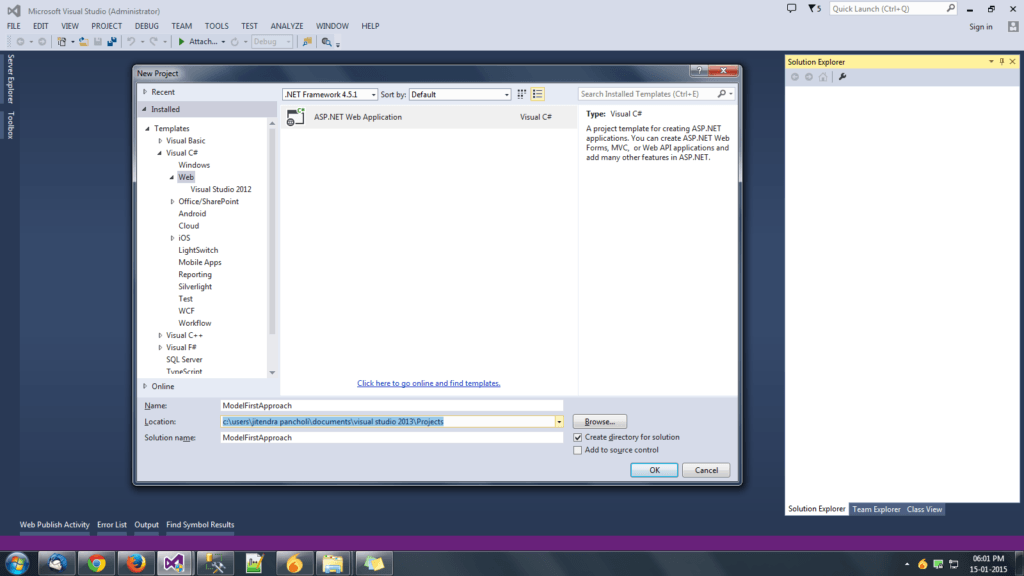
- Open Visual Studio 2013 and click on ‘New Project’.
- With the left menu, select ‘Web’ tab. Within the flyout displayed thereafter, select the option ‘ASP.NET web application’ followed by naming the application as “ModelFirstApproach”. Pls. Refer the screen-shot below:
Image may be NSFW.
Clik here to view.
- Now, select the value for project template as ‘MVC’ and click on ‘OK” as shown in below screen-shot:
Image may be NSFW.
Clik here to view.![Choose MVC]()
On hitting the ‘OK; button, Visual Studio will automatically generate a new MVC5 web application and add different files and folders to the ‘ModelFirstApproach’ project.

Step 2- Add Entity Data Model
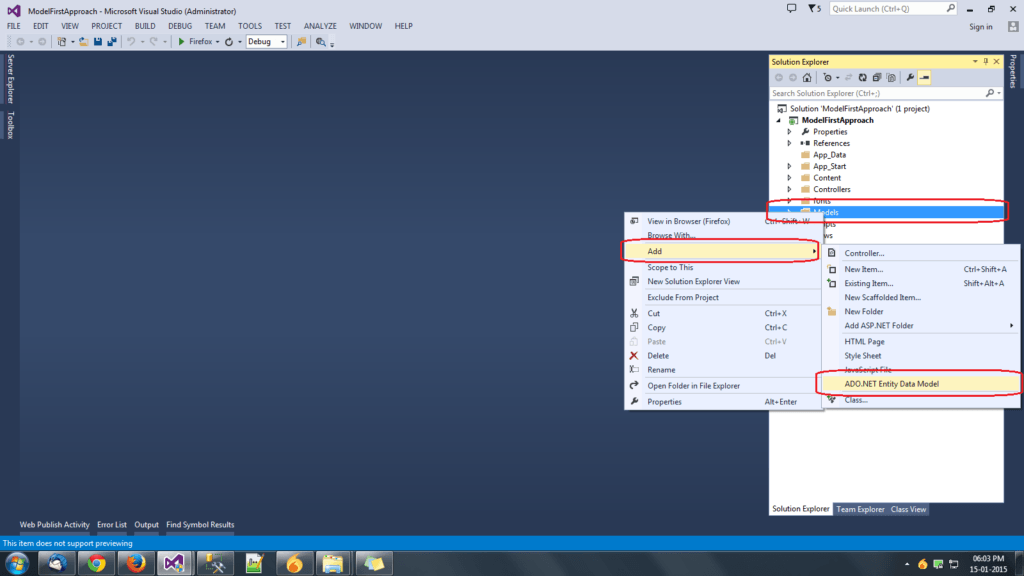
Here, you need to add the ADO.NET Entity data model to the created ASP.NET web application. For this, you’ll be required to create an empty model using the below process:
- Go to Solution Explorer and right click on ‘Models’ folder, followed by clicking on ADO.NET Entity Data Model as shown in below screen-shot:
Image may be NSFW.
Clik here to view.![ADO.NET Entity Data Model]()
- Define a model name. In this example, I’ve named it as ‘ModelFirstModel’ as shown below:
Image may be NSFW.
Clik here to view.![MVC Model]()
- On the proceeding Entity Data Model wizard, simply select ‘Empty Model’ and click on ‘Finish’ as shown below:
Image may be NSFW.
Clik here to view.![Entity Data Model Wizard]()
Upon clicking ‘Finish’, you’ll be able to view the ‘Entity Data Model Designer’ as shown below:
Image may be NSFW.
Clik here to view.![Entity Data Model Designer]()


Step 3- Visualize and design the Entity Data Model using the Entity Data Model Designer
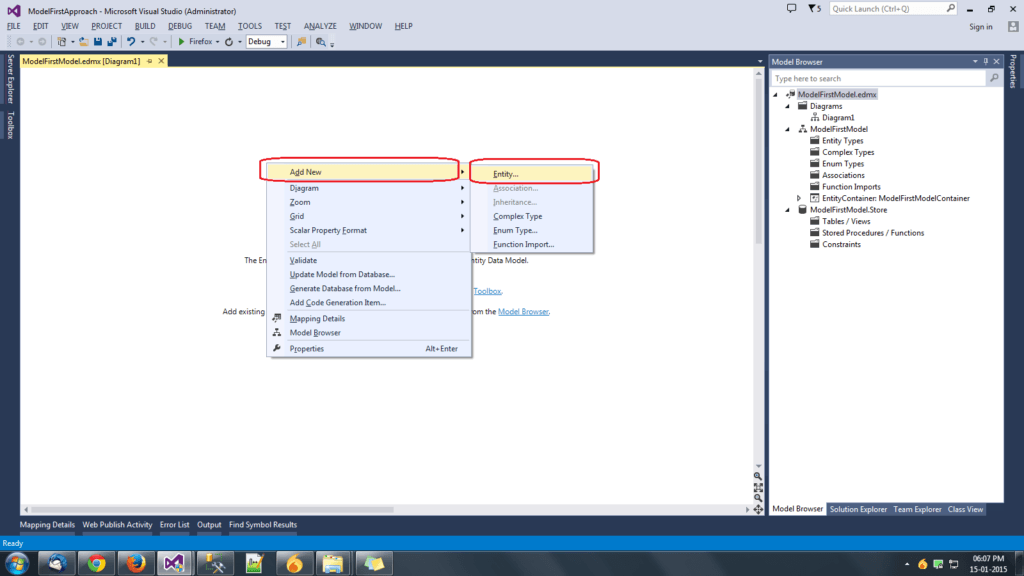
Adding Entity Model- For this, follow the below procedure:
- Right click on ‘Data Model Designer’ and click on ‘Add New’ and ‘Entity’ options as shown in below screen shot:
Image may be NSFW.
Clik here to view.![Add New Entity]()
- Now, in the Add New Entity wizard, specify a name for the entity as shown below:(In my example, I’ve named it as ‘Books’
Image may be NSFW.
Clik here to view.![Book Entity]()
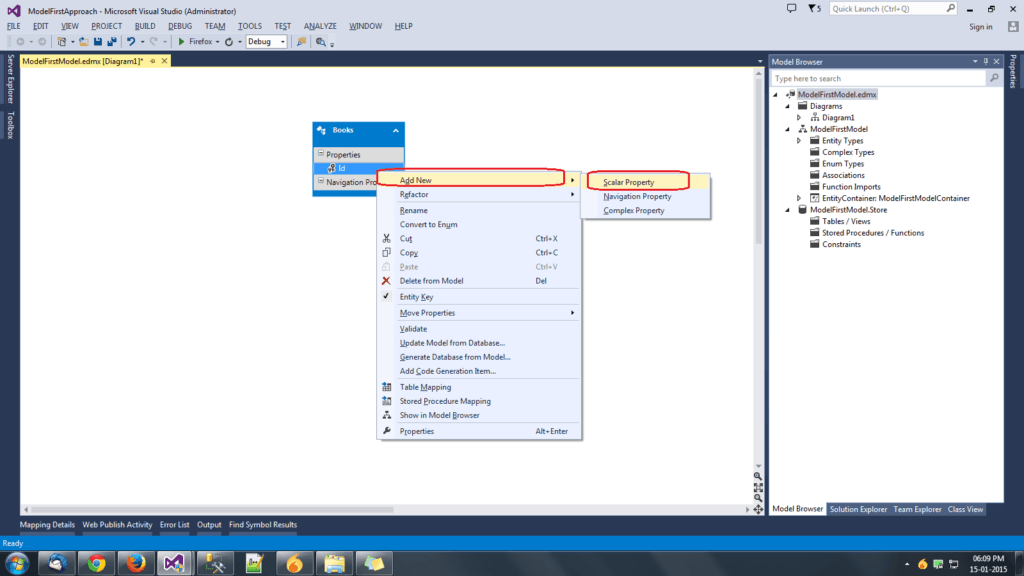
Clicking on ‘OK’ within the above screen-shot will create a new entity - Add a scalar property to the created entity by simply right clicking on the entity, followed by clicking on ‘Add New’ and ‘Scalar Property’ options as shown below:
Image may be NSFW.
Clik here to view.![Entity Scalar Property]()
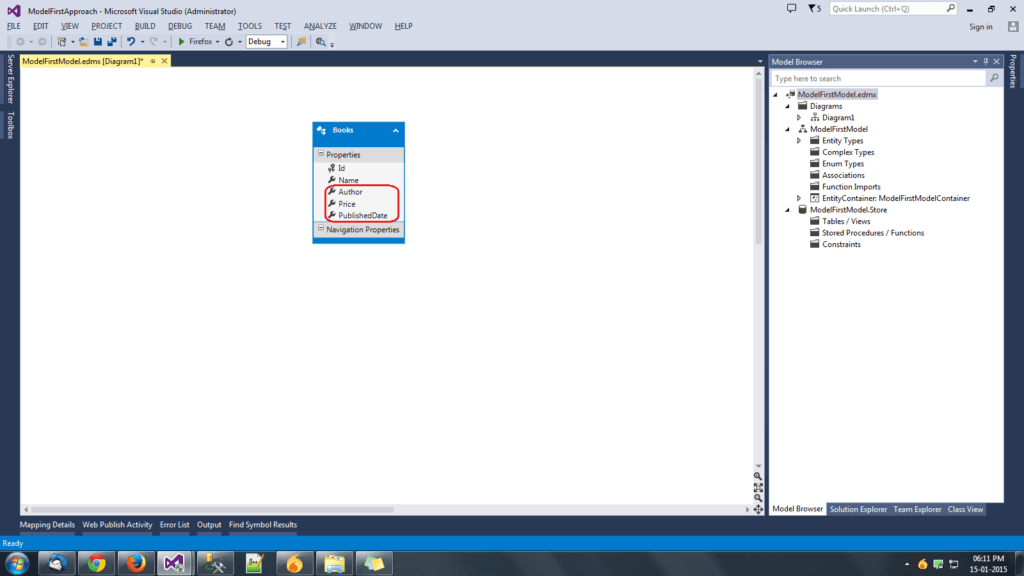
- Now, change the name of the property, followed by adding more scalar properties to the created entity as shown in below screen-shots:
Image may be NSFW.
Clik here to view.![EDM Scalar Property]()
Image may be NSFW.
Clik here to view.![Entity Data Model Properties]()


Step 4- Generate Database using the Model
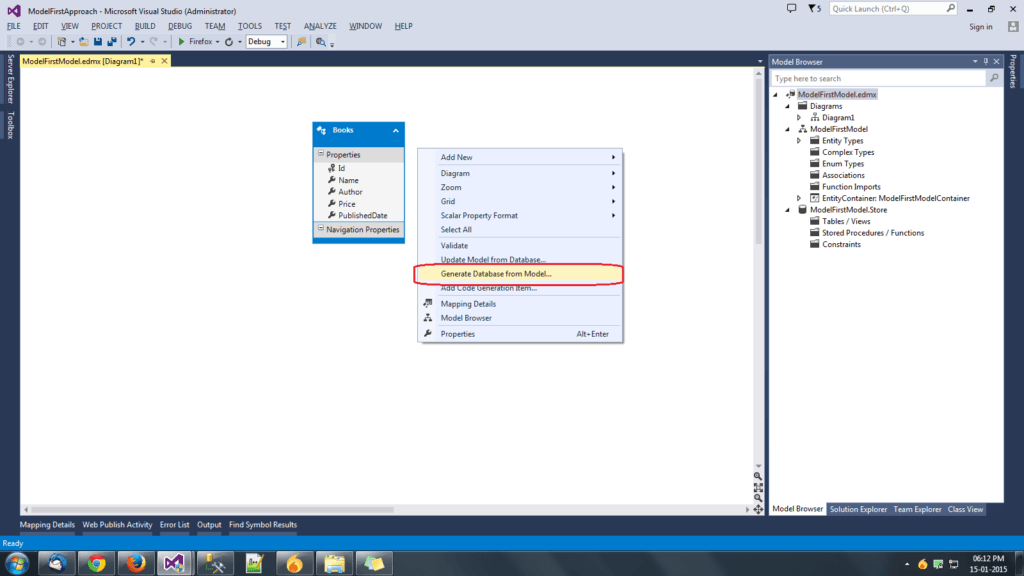
Once you’re done with creating the entity model, opt for generating database from the same using the steps explained below:
- Right click on Data Model Designer Surface and select the option ‘Generate Database from Model’ option from the dropdown list as shown in below screen-shot:
Image may be NSFW.
Clik here to view.![Data Model Designer Surface]()
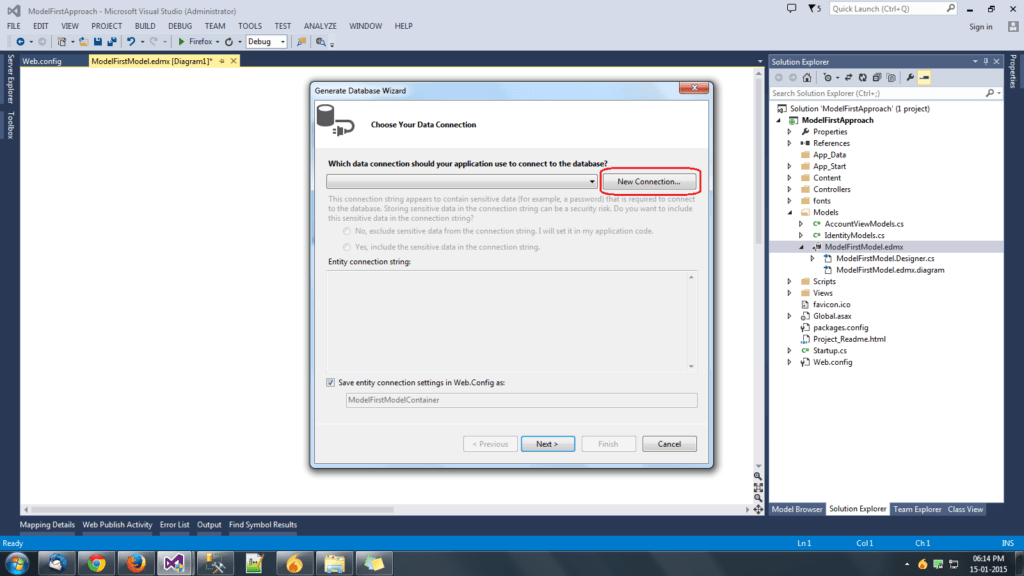
- Now, in the next wizard, click on ‘New Connection’ button to connect the app with the database as shown in below screen-shot:
Image may be NSFW.
Clik here to view.![EDM Connection]()
- In the next Connection Properties wizard, input a name for the server and database. The screen for this will be similar to:
Image may be NSFW.
Clik here to view.![Connection Properties Wizard]()
Clicking on ‘OK’ will create the connection and you’ll be shown this screen:
Image may be NSFW.
Clik here to view.![Connection Wizard]()
Clicking on ‘Next’ within the above screen, you’ll be shown a screen that’s exactly similar to this:
Image may be NSFW.
Clik here to view.![Summary of Settings]()
- Right click on the script and further click on ‘Execute’ option as shown in below screen-shot:
Image may be NSFW.
Clik here to view.![Execute Now]()
Upon executing the database, you’ll be able to view it in the Server Explorer as shown below:
Image may be NSFW.
Clik here to view.![Executing the database]()


Step 5- Adding MVC5 controller and view using the Entity Framework
For this, follow the below steps:
- The ‘Books’ class is generated in the models folder. Here, all you need to do is simply edit the code with the highlighted one as shown below:
//------------------------------------------------------------------------------

//

// This code was generated from a template.

//

// Manual changes to this file may cause unexpected behavior in your application.

// Manual changes to this file will be overwritten if the code is regenerated.

//

//------------------------------------------------------------------------------
namespace ModelFirstApproach.Models
{
using System;
using System.Collections.Generic;
using System.ComponentModel.DataAnnotations;public partial class Books
{
public int Id { get; set; }
[Required(ErrorMessage=”*Required”)]
public string Name { get; set; }
[Required(ErrorMessage = “*Required”)]
public string Author { get; set; }
[Required(ErrorMessage = “*Required”)]
[Display(Name=”Price(USD)”)]
public decimal Price { get; set; }
[Required(ErrorMessage = “*Required”)]
[Display(Name=”Publised Date”)]
public DateTime PublishedDate { get; set; }
}
}In the above code, I’ve changed the property’s display name.
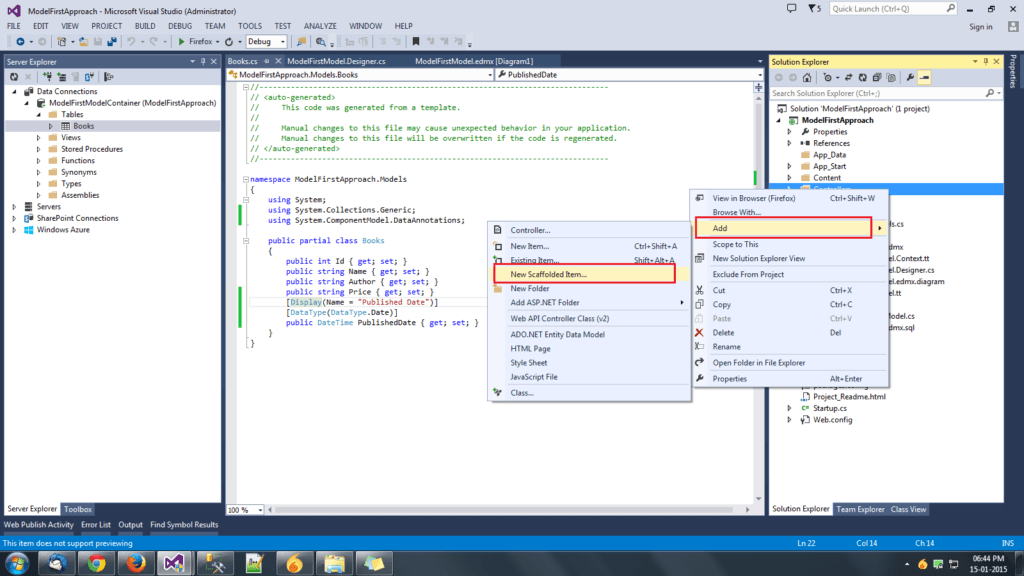
- Now, right click on the Controller and further click on ‘Add’ and then ‘New Scaffolded Item’ as shown in below screen-shot:
Image may be NSFW.
Clik here to view.![New Scaffolded Item]()
- In the Add Controller wizard, select the option ‘MVC5 Controller using the Entity framework with views’ as shown below:
Image may be NSFW.
Clik here to view.![MVC5 Controller using EF]()
On the above screen, click on ‘Add’ button to reach the screen shown below:
Image may be NSFW.
Clik here to view.![MVC5 Controller with View]()
On the above screen, select model class and data context class, followed by clicking on ‘Add’ button. Once you click on ‘Add’ button, a ‘BooksController class will be generated in the Controller folder along with the generation of Books folder in the Views folder.


Step 6- Perform CRUD (Create Read Update and Delete) operations
I’ve segregated this step into specific sections explained below:
- Create an Action link to the view. For this go to Views-> Shared-> Layout.cshtml file and edit the code with the one highlighted in the below mentioned code snippet:
<!DOCTYPE html>

 <html>

 <head>

     <meta charset="utf-8" />

     <meta name="viewport" content="width=device-width, initial-scale=1.0">

     <title>@ViewBag.Title - Book Store</title>

     @Styles.Render("~/Content/css")

     @Scripts.Render("~/bundles/modernizr")

</head>

 <body>

    <div class="navbar navbar-inverse navbar-fixed-top">

       <div class="container">

           <div class="navbar-header">

               <button type="button" class="navbar-toggle" data-toggle="collapse" data-target=".navbar-collapse">

               <span class="icon-bar"></span>

               <span class="icon-bar"></span>

               <span class="icon-bar"></span>

               </button>

              @Html.ActionLink("Best Books", "Index", "Home", null, new { @class = "navbar-brand" })

           </div>


<div class="navbar-collapse collapse">

           <ul class="nav navbar-nav">

                 <li>@Html.ActionLink("Home", "Index", "Home")</li>

                 <li>@Html.ActionLink("About", "About", "Home")</li>

                 <li>@Html.ActionLink("Contact", "Contact", "Home")</li>

                 <li>@Html.ActionLink("Books", "Index", "Books")</li>

           </ul>

            @Html.Partial("_LoginPartial")

        </div>

     </div>

 </div>

 <div class="container body-content">

        @RenderBody()

         <hr />

         <footer>

            <p>© @DateTime.Now.Year - Book Store</p>

          </footer>

 </div>
@Scripts.Render(“~/bundles/jquery”)
@Scripts.Render(“~/bundles/bootstrap”)
@RenderSection(“scripts”, required: false)
</body>
</html>Observe the above code carefully and you’ll find that the app name and title have been edited.
- For Create operation, you’ll need to implement the below steps:
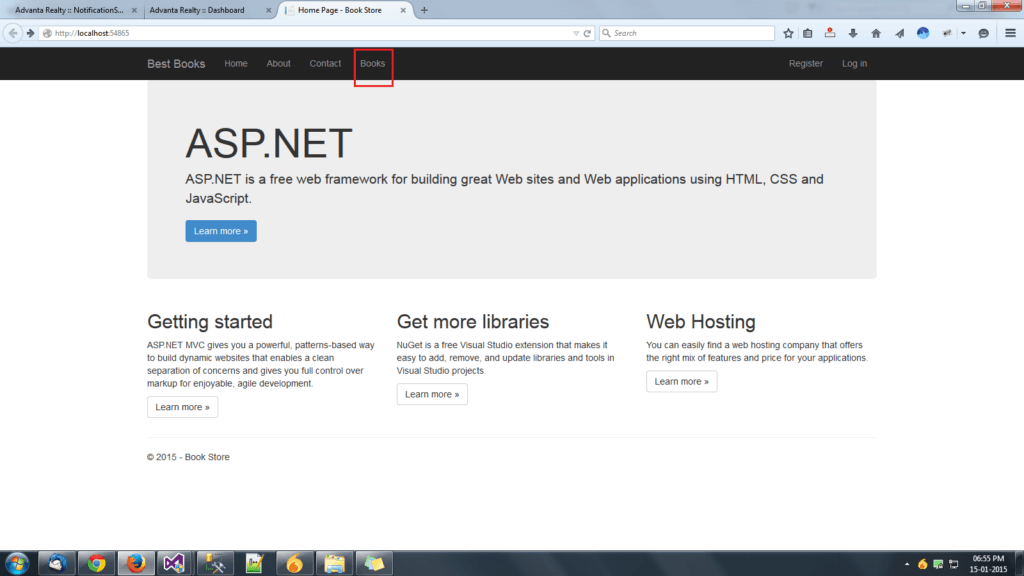
- Run the MVC application and on its home page, click on ‘Books’ tab available within the header section as shown below:
Image may be NSFW.
Clik here to view.![MVC Application Home]()
- On the next window, click on ‘Create New’ link for creating a new record. Have a look at this:
Image may be NSFW.
Clik here to view.![MVC App Index Page]()
A ‘form will be displayed on clicking the ‘Create New’ link. Simply enter values for fields viz: Name, Author, Price(USD) and Published Date and hit the ‘Create’ button. Screen for this step looks exactly similar to the one shown below:
Image may be NSFW.
Clik here to view.![Create Operation in MVC]()
Opt for adding multiple records using the procedure explained above.
- Run the MVC application and on its home page, click on ‘Books’ tab available within the header section as shown below:
- For Read operation, simply click on Books link and you’ll be able to read all the records available for the same. See this:
Image may be NSFW.
Clik here to view.![Read Operation in MVC]()
- For Update operation, simply click on the ‘Edit’ link for the record you want to update the details for. You’ll be able to view the details for the respective books record in an editable format. Make the desired alterations and hit the ‘Save’ button to save the changes made to the book.
Image may be NSFW.
Clik here to view.![Update Operation in MVC]()
- For Delete operation, just click on the ‘Delete’ link available against the record you want to delete from the database. A window like this will appear on your monitor:
Image may be NSFW.
Clik here to view.![Delete Operation in MVC]()
Clicking on ‘Delete’ button will remove the respective record from the database.


Step 7- Check the updation of tables and records within the application’s database
You can do this with the help of Server Explorer, following the below mentioned steps:
- Open the Model in the Server Explorer
- Click on ‘Tables’ folder, followed by a right click on ‘Books’ and a final click on ‘Show Table Data’ option. The screen for this will look exactly similar to the one shown below:
Image may be NSFW.
Clik here to view.![MVC with Entity Framework]()
The records would hence be displayed in the same manner as shown in the below screen-shot:
Image may be NSFW.
Clik here to view.![ASP.NET MVC5 using Entity Framework 6]()


That’s all for this post.
Back to top
Closing Thoughts
Hope by now you’d have become well familiar with the Model First approach used in ASP.NET MVC5. So, what’s the wait for? Get going with coding marvelous ASP.NET web applications which have the caliber of impressing one and all.
About the Author – Celin Smith
A seasoned web developer with some bona fide writing skills, Celin Smith works at Xicom Technologies Ltd. Serving Xicom , a leading web development company , Celin basically writes about web & mobile apps, and technologies including Java, .NET, PHP, etc.
Top 10 Interview Questions and Answers Series:
- Top 10 ASP.NET MVC Interview Questions
- Top 10 WCF Interview Questions
- Comprehensive Series of WCF Interview Questions
- Top 10 HTML5 Interview Questions
- Top 10 ASP.NET Interview Questions
- Comprehensive Series of ASP.NET Interview Questions
- Top 10 ASP.NET Web API Interview Questions
- Top 10 ASP.NET AJAX Interview Questions
The post Understanding Model First Approach in MVC5 with EF6 appeared first on Web Development Tutorial.